DIY kid’s Halloween lantern with FREE PDF templates
- Oct 15, 2020
- 3 min read
Halloween is going to be a little different this year and although we might not be able to trick or treat, we can still get crafting!
Perfect to occupy the kids for a morning, these fun and creative Halloween lanterns are super easy to make even for the smallest Halloween fan. From the painting the lanterns and cutting out our spooky motifs (choose from a ghost, pumpkin, bat or skull from our free PDF) to carrying them round the garden or adding them to your Halloween display, we think these are just the ticket for a homemade Halloween.

All the components are available from our website and better still each lantern costs under £2.50 to make for the basic kit of A3 polyester sheet, Lantern Lid & Base, lantern carrier wire and lampshade rivets. And if you have fun making these lanterns why not try our printed Halloween lantern using the same motifs, that you can find on last week's blog post here.
Follow our DIY tutorial below to find out how to make them...
What you’ll need to make your Halloween lantern
From our lantern component range:
Double-sided tape (this can also be found in any of our lampshade making kits)
Acrylic paint (orange & black)
Ruler
Pliers or jewellery pliers
How to make your Trick or Treat lantern
1. Take your cheese box base and lid and paint both black with the acrylic paint. Leave to dry and then paint with a second coat.

2. On the acrylic sheet measure and cut a piece 35 cm x 15 cm, which will form the main section of your lantern. Along one short edge put a strip of double-sided tape. Leave the red backing tape in place for the moment.

3. Print the Free PDF download and cut around the individual motifs. Lay onto a foam sheet and draw around each one, then cut out. Using the cutting lines on the motifs cut the pumpkin and bat into sections – this creates negative space of the light to shine through!
1. Position the motifs on the acrylic sheet, using the double-sided tape / glue dots. When positioning leave a gap of 2cm at the top and the bottom of the sheet and space at the seams for the sheet to overlap.

5. Return to your dry cheese box lid and with the hole puncher, punch a hole between the top and the bottom of the lid edge. Repeat on the opposite side. This will hold the handle in place.

6. Take the lantern carrier wire and bend around 1cm back on itself at each end with pliers.

7. Push the wire through the holes and position the wire so the bent section sits inside the hole.
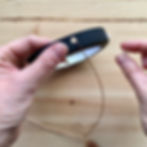
8. Secure in place using one a lampshade rivet. This will stop the lantern carrier from falling out of the lid. Repeat on the other side.


9. Add a length of double-sided tape to the top and the bottom of your lantern piece.

10. Without removing the backing tape roll the tube to check how large your overlap should be. The tube should fit snugly inside the lantern base.

11. Then removing the backing tape from the short end of the lantern centrepiece and gently roll into a tube sealing the short ends over each other with the tape.
12. Remove the backing tape along the top and the bottom of the acrylic sheet and position inside the base. Push your hand inside the lantern and push the centre piece into place.

13. Repeat for the lid fixing into place using your fingers.

13. Pop in an electronic tea light, using either double-sided tape or a glue dot on the base to stop it from moving around and you’re done!

#halloween #lanternkit #lanterns #DIYtutorial #creativeproject #DIY #halloweenproject #kidscraftproject #halloweendecorations #halloweenlantern #kidshalloweencraft #Halloweenmotifs #lanterncomponents #DIYhalloween #freetemplatedownload #printingwithfoam #halloweenDIY #meycolanterncomponents #meyco #DIYlanterns