Mastering the Art of Seam Sealing with Our New Professional Lampshade Jig
- Feb 10
- 3 min read
Updated: Feb 17
Calling all lampshade makers! We’ve used our years of hands-on experience to create a brand-new tool designed to make seam sealing easier and more reliable: the Lampshade Seam Sealing Jig. This innovative jig helps you achieve strong, neat seams every time, no matter which sealant you prefer to use.
In today’s blog post, we’ll walk you step-by-step through how the Seam Sealing Jig works and introduce some of our other professional lampshade-making tools. They’re all designed to save you time, improve consistency, and help you create beautiful, high-quality handmade lampshades with less effort.

NEW Lampshade Seam Sealing Jig
Our passion for lampshade making means we’re always looking for new ways to improve the process of professional lampshade making and NEW for 2026 is our Lampshade Seam Sealing Jig.
Designed in house at Dannells, by expert engineer David Jones, the Lampshade Seam Sealing Jig is highly effective at sealing seams. The precision mechanism sandwiches the lampshade seam between foam-lined jaws, applying a strong, even pressure exactly where it’s needed, whilst holding the lampshade perfectly flat.
Working for fast cure adhesives, such as Bostik Superglue or Gorilla Glue, which can be sealed in as little as 30 seconds and lampshades sealed using our range of Double-sided Tapes, our Lampshade Seam Sealing Jig will produce a consistent, professional grade seam every time.
Accommodating a maximum lampshade seam length of 42cm, our Lampshade Seam Sealing Jig will work with all size of lampshade up to our largest drum lampshade measuring 70cm in diameter.

How to Use
Ideal for attaching temporarily to a work surface or bench, or using permanently in a fixed production set up with one, or multiple Lampshade Seam Sealing Jigs for maximum productivity, follwo the simple steps below to operate:
1. Secure the jig to your work surface using a clamp or screws.

2. Open the top jaw.

3. Apply adhesive or tape to the lampshade seam.

4. Place the seam centrally on the bottom jaw.
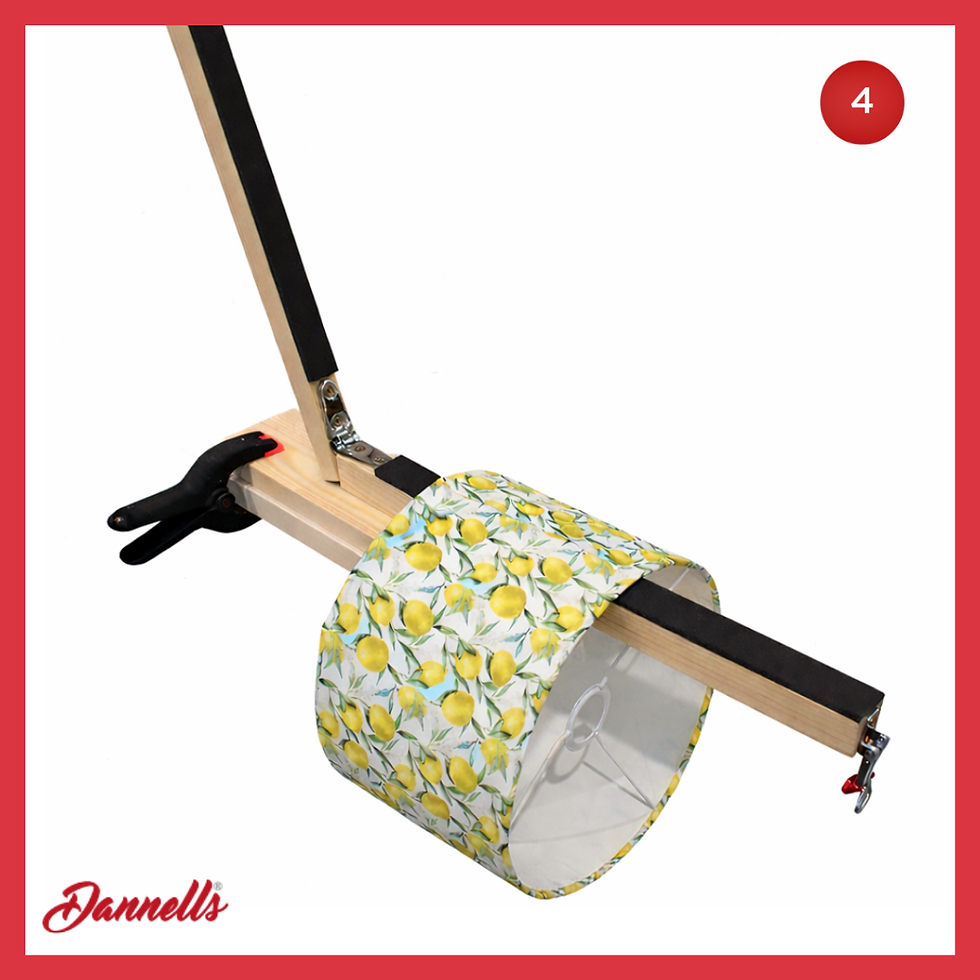
5. Close the top jaw.

6. Swing the clamp closed.

7. Allow sufficient time for the adhesive to set.
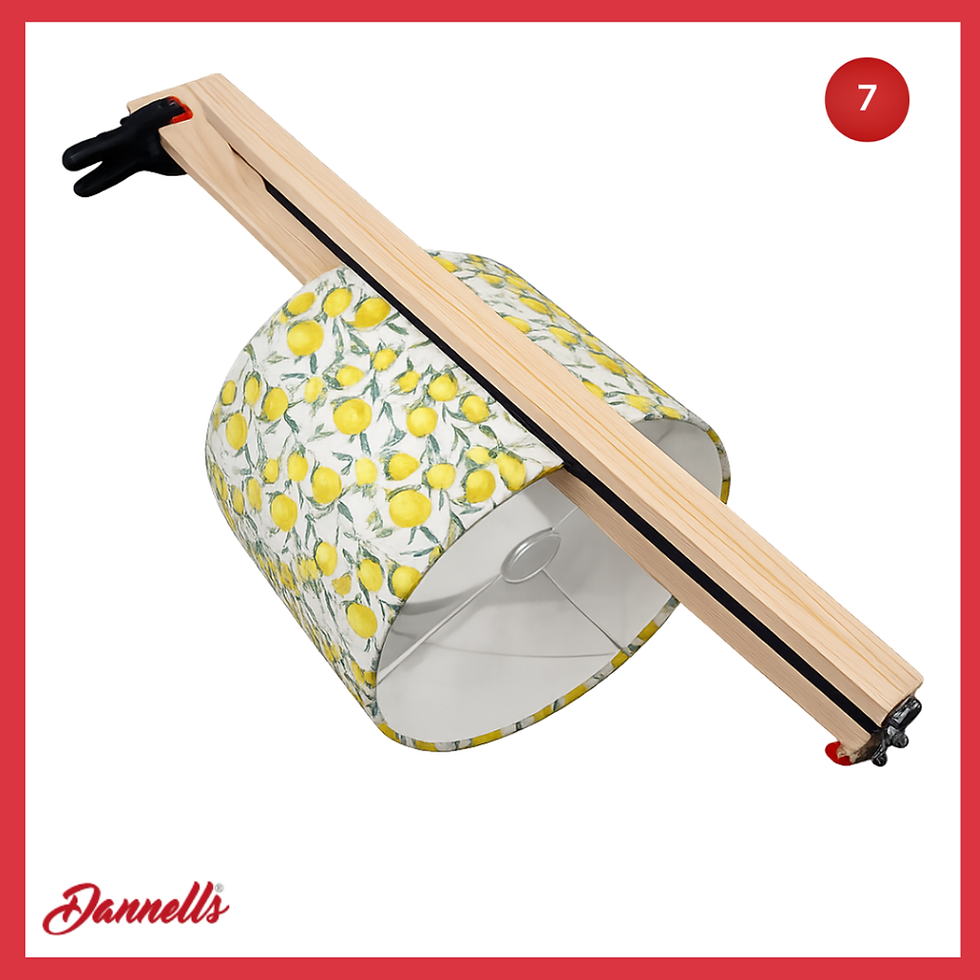
Release the clamp and remove the lampshade.

Rolled Edge Knife
As a professional lampshade maker, the flexibility to supply lampshade that meet your client's exact needs increases your chance of winning business. The Olfa Rolled Edge Creasing Knife allows you cut bespoke lampshade panels, then add a ‘kisscut’ margin for a crisp and effectively create the required fabric margin for a professional edge at the top and bottom of your handmade lampshade.
The tool can be set to score different widths of kisscuts on the panel, ranging from 9mm to 18mm. to replicate the ‘kisscut’ found on the panels in our Lampshade Making Kits, and Pre Cut Lampshade Panels. An advantage of scoring a bespoke kisscuts means you can easily increase its width, for example when making a shade from thicker fabrics, such as wool or tweed.
Read our blog post How to Use a Rolled Edge Tool to Cut Lampshade Panels, to learn more and see how easy this lampshade tool is to use.


Lamination Squeegee
The hand handheld size and soft velvet-like edge of the Lamination Squeegee is specifically designed to firmly adhere your choice of lampshade fabric to you Stick It ® Panel, without damaging the surface of the fabric.
Professional Lampshade Maker By Poppy, demonstrates perfectly how to use
a Lamination Squeegee, in this video below, as she make an eye-catching pair of orange and lemon inspired shades. We love how Poppy uses sewing weights for holding her panel in place, giving her her greater leverage when smoothing her fabric to the panel.
Alongside fabric the Lamination Squeegee promises an easy and wrinkles free is application of our popular, colourful vinyl coverings, which can be applied to the white side of our Stick It® panels in our Lampshade Making Kits.
Why not try adding a coloured vinyl covering to your next shade, by following the step by step instructions on our blog - Using Vinyl as a Lampshade Inner.


Olfa Lampshade Tucking tool and Cutting Knife
Whilst makers use a variety of tools for the finishing stages of making a lampshade, commonly known as 'tucking in', we highly recommend our dual purpose Olfa Lampshade Tucking tool and Cutting Knife.
Ergonomically designed to fit comfortably in your hand, one end has a robust metal pick for tucking fabric under the lampshade ring to create a clan, crisp edge, whilst the other has a ultra sharp knife, which can be use to cut away any loose fabric frays.
Our tip for keeping the metal pick end clean between tucking lampshades is to wipe with alcohol or methylated spirit after use to remove any residue from the glue.


#Newproduct #LampshadeSeamSealingJig #ProfessionalLampshadeMakers #LampshadeMakingTools #LampshadeSeams #NewLampshadeMakingTool #DIYlampshades #bespokelampshades #professionallampshadetips #uniquelampshades


Comments