DIY Tutorial - Vintage Doily Dreamcatcher
- May 24, 2021
- 3 min read
Garden parties, BBQ's, camping trips or alfresco cocktail parties, however you're seeing friends over the bank holiday weekend, bring a touch of boho style to your outdoor space with our quick and easy DIY Vintage Doily Dreamcatcher.
Great for upcycling, cotton doilies are beautiful pieces of vintage textile and handily are relatively easy to find on Etsy and Ebay or your local charity shop. Cheap as well as simple to make, all you'll need is a Dannells plain ring, some embroidery thread and ribbon, bits and pieces of trim, lace or shells for the finishing touches. Imagination is the only limitation!

What you'll need for your Vintage Doily Dreamcatcher
Vintage doily – approximately 25 cm wide
Pegs or quilting clips
Double-sided tape
1m ribbon (for wrapping around the ring)
White embroidery thread
Large embroidery needle
Variety of trims, ribbon lace for hanging
Fabric scissors
Notes:
When choosing a doily for your dreamcatcher pick one that is approximately 5cm smaller than the ring you’ll be using. This gives space for the doily to stretch and sit inside the ring tightly.
How to make your Vintage Doily Dreamcatcher
1. Taking your ring, stretch the doily to the ring and attach with pegs or quilting clips, to check the size and reach of the doily.

2. Remove the doily and place a small piece of double side tape around the circumference of the ring.

3. Remove the backing from the tape, attach the ribbon and start wrapping the ribbon around the ring. We used a pretty peach mesh ribbon, but any kind of ribbon will do the job.

4. Re-peg the doily to the frame and thread the needle with embroidery thread.
TOP TIP: You can split the thread into two groups of three strands to make the thread thinner if you have a needle with small eye.

5. Leaving a tail of thread approximately 10cm long make a knot around the frame.

6. Place your needle through the doily at the point closest to the ring and pull the thread down towards the ring.
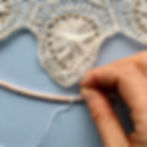
7. Slide the needle under the two rows of thread. This will create a loop near to the doily. Push the needle through the loop to create a knot, making sure that the tension is tight bringing the doily to the ring.

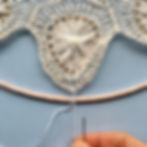
8. Taking the needle up around the frame and behind the doily, push the needle through the next point for pulling taught.

9. Again bring the thread down, creating two lines of thread. Push the needle behind the two threads and make a loop.


10. Push the needle through the loop is as pulling the thread as tight as possible to create tension and to make a knot to anchor the doily.


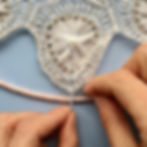
11. Repeat steps the same steps to knot the thread around the ring.


12. Continue around the ring using steps 9, 10 and 11.
13. When you reach the initial knot, tie the 10cm loose end to your final piece of thread. Snip so thread match.

14. Pick out trims, ribbons and lace to hang from the bottom of your dreamcatcher. We've also used shells tied to strings as well for a modern boho look.

15. Volia! Your dreamcatcher is ready to hang in your garden!

#dreamcatcher #plainring #vintagedoily #doily #gardendecoration #quickmake #budgetcraftproject #DIYtutorial #makeandtake #quickDIYproject #DIYcraftproject #DIYcreative #scrapbuster #stashbuster #fabricuseup #minimake #easyDIYproject #stashbusting #bankholidaycraft #outdoorcraft #naturaltrends #interiordesign