DIY Tutorial - How to apply wide trim to a lampshade
- May 19
- 2 min read
Adding a wide, eye-catching trim to a handmade or existing lampshade can completely transform its look - and it’s an easy technique to master.
Follow our simple step-by-step tutorial to achieve the perfect trimmed lampshade finish. We’ve used a fabulously bright Aztec-inspired trim from Sew Cool, but the same method works beautifully with any style of trim, including the braids, fringes, and tasselled designs available in the Dannells Trim range.

What you will need:
Needcraft Lampshade Making Kit – we’ve chosen a 30cm Hexagon lampshade
Fabric - we've used our Chic 39 Pale Turquoise
Royal Aztec Braid with double edged fringe - 45mm wide from Sew Cool
Household scissor (for cutting tape)

1. Follow the instructions in your kit and apply the Self-Adhesive Panel to the fabric, cut down to size, roll the frames, seal the seam and tuck the fabric margin under the frame.

2. Before start decide where you would like to position your trim on the lampshade. This will depend on whether your lampshade will be used for a table lamp or a pendant lamp, and if you would like the trim at the top or bottom of your lampshade.
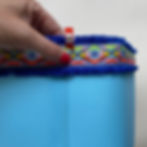
3. Wrap the trim around the lampshade, overlapping the trim around 5 cm over the lampshade seam. Use Wonder Clips to hold in place.

4. Cut the trim.

5. At one end of the trim, run a strip of double-sided tape along the width of the trim, nearest to the cut edge.

6. Cut the tape and peel away the backing

7. Fold the trim over to create a neat edge.

8. Starting at the inside edge of the seam, apply a line of tape around the edge of the lampshade, leaving a small margin between the lampshade edge and the tape.

9. Cut away the tape when you reach the seam.

10.Using the depth of your trim as a guide, position a second line of double-sided tape below the first.

11. Peel away the red tape backing on both lines of tape.

12. Position the unfolded end of the trim so it sits around 1cm over the seam. Continue to gently press into place the trim, using the top tape as a guide.

13. When you reach the seam, add a small spot of glue to the trim at the starting point and push the folded trim down to seal.

Hold in place with a wonder clip until fully secured.

More trim know how?
Want to learn more about adding trims to lampshades? Check out our 4 ways to add lampshade trims post and find more methods of adding trims with alternative tapes and glues.


Bring on the Braids, Tassells and Fringing
Did you know that we have a Dannells range colour matched trim? Pick from our Chainette Fringing in 50mm and 100mm lengths, neat woven Braid or eye catching Tassel Fringe. Showcasing beautiful quality, and at super competitive prices these are perfect to elevate your lampshades.

