Professional Tips for Working With Lampshade Spokes
- Jun 16
- 4 min read
While making a lampshade is generally straightforward, the way fabric behaves can sometimes present a few challenges. One common issue is fraying around the lampshade spokes, which can affect the overall finish of your project.
In this post, we'll share tried-and-tested techniques, expert tips, and recommended products to help you achieve a flawless fabric finish around your lampshade spokes. We've also gathered advice from experienced makers within our Lampshade Makers Facebook Forum, bringing together practical solutions from professionals who work with lampshades every day.

General Tips for Fabric Types
The rule for choosing fabric to make a handmade lampshade is that it needs to be woven, not stretchy, yet some woven fabrics tend to fray, because of their texture, weave or fibres.
Fabric which tend to fray, but are not limited to, are:
To check if your fabric frays, test by pulling fibres from the cut edge which will easily come away.

Precise Cutting and Tucking
For fabrics that have little to no fray, use the following method.
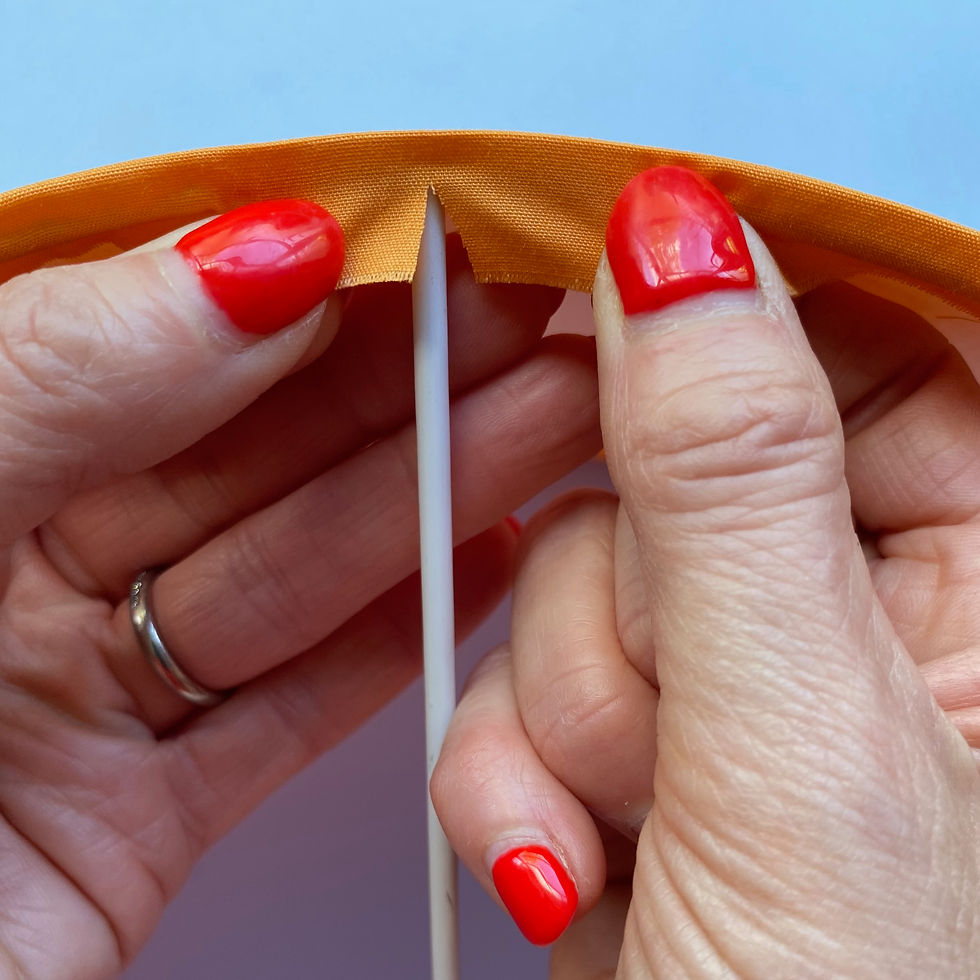
Make sure your fabric margin is pulled taught over the edge of the lampshade panel, before cutting. This ensures the fabric sits neatly on either side of the lampshade spokes.

Gently pull the fabric towards you and using the tips of your fabric scissors, cut into the fabric, but only to the edge of the ring. This ensures the fabric won’t fray into the panel.

Push the fabric to either side of the spoke.
Using your Rolled edge tool, tuck the fabric ‘curtains’ behind the rings. Again, this stops any fraying and we find using a long side of our flexible Rolled Edge Tool effective.


Using Fray Stop and PVA Glue
Preventing fabric fray can be done with a variety of products, but our professional lampshade makers prefer to use Fray Stop and PVA Fabric Glue.
Fray Stop Methods
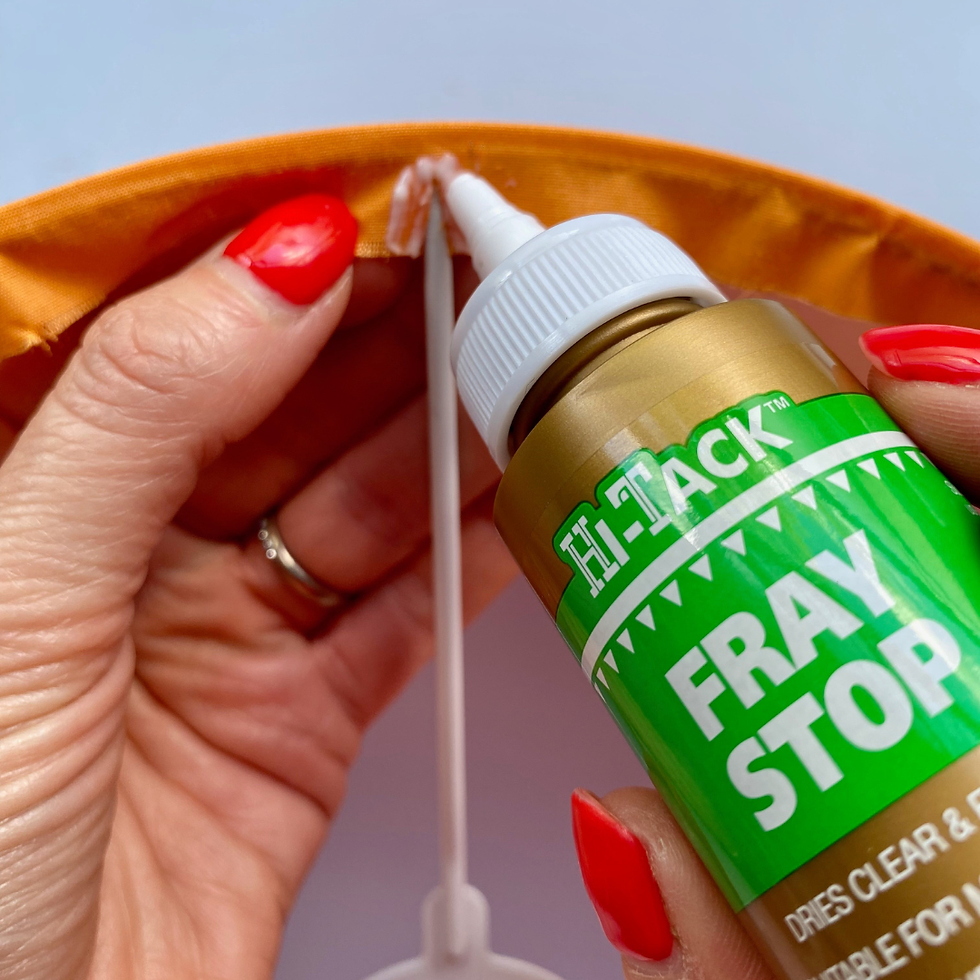
Fray Stop is a liquid adhesive, that help raw fabric edged from fraying. It lightly bonds the fabric fibres together and dries completely clear and therefore not visible and it allows the fabric to remain flexible around the spoke.


Method 1
Follow the lampshade making kit instructions, stopping just before cutting the spokes and apply a small amount of Fray Stop to the fabric that sits above the spoke, been careful to apply only up where the lampshade ring will sit.
Follow the instructions for cutting and tucking as above.

Method 2
Apply along the outer edge of the kisscut as shown in the video below and then cut in at the spokes using the instructions above.
Method 3
Many of our professional lampshade makers prefer to cut the fabric margin first and then apply Fray Stop, to the fabric cut.
Chris Skaife of Nidderdale Shades LINK says:
Snip at the spoke then add a small amount of fray stop to the cut edges and tuck under as normal.
PVA Glue
PVA Fabric Glue is another clear adhesive solution, that dries clear and allow the fabric to stay flexible enough to handle, and it particularly popular with our professional makers for creating a neat finish around handmade lampshade spokes.
As with the Fray Stop there are a couple of application options – either adding this to the fabric margin, at the position of the spokes, or running the PVA along the length of the fabric margin.
Some makers prefer to water the PVA Fabric Glue down before applying. Amanda Wheatie of Wyre and Gimble offers this advice:
I don't water down my PVA but smear it on thinly with a finger on the reverse of the fabric, leave to dry and then cut the fabric to fit around the spokes. I've never had an issue with it showing through the fabric.
Similar to PVA, Mod Podge is a popular, water-based all-in-one glue, sealer, and finish used in arts and crafts and is used by our makers.
Nancy Picken of Glow and Co lampshade NZ says:
I put a line of Modpodge at the spoke points (from spoke to edge of fabric), what for it to dry and then cut it


Using Tesa Double-Sided Tape
Our professional lampshade makers are full of creative hacks for improving their lampshade making, and generously share these on our Lampshade Makers Facebook Group, which is open to every lampshade maker.
Inspired by David Beard-Jnanasalin's extremely original hack, we've taken his concept of using Tesa Double-Sided Tape to prevent fraying fabric around the spokes, and have created the following step by step tutorial:
1. Pull the fabric up towards the spoke and find the point where the fabric sits above the ring.

2. Measure distance from the lampshade edge to the identified point - this should be roughly 7-8mm.

3. Position your Tesa Double-Sided Tape below the spoke, to sit in line with it.

4. Measure 7-8mm from the lampshade edge and mark a line on the red tape backing. If you are unsure, it is better to over measure than under measure!

5. Cut out a narrow triangle with the shortest side sitting on the marked line.

6. Remove the backing from the tape.

7. Carefully fold the fabric up and over the spoke.

8. Tuck in using your rolled edge tool.


Comments